Recent Posts

Monday, November 26, 2012

DIY Peppermint Lip Balm Recipe


One thing we can never be without is a tube of lip balm. You'll find one in every pocket, drawer, glove box and anywhere else we can think to stash a tube. After reading the labels of several lip balms and not being able to pronounce most of the ingredients we decided to make our own. It's super easy and you know exactly what are you are putting on your lips.

This recipe makes about 35 .15 ounce tubes and here's how we did it......

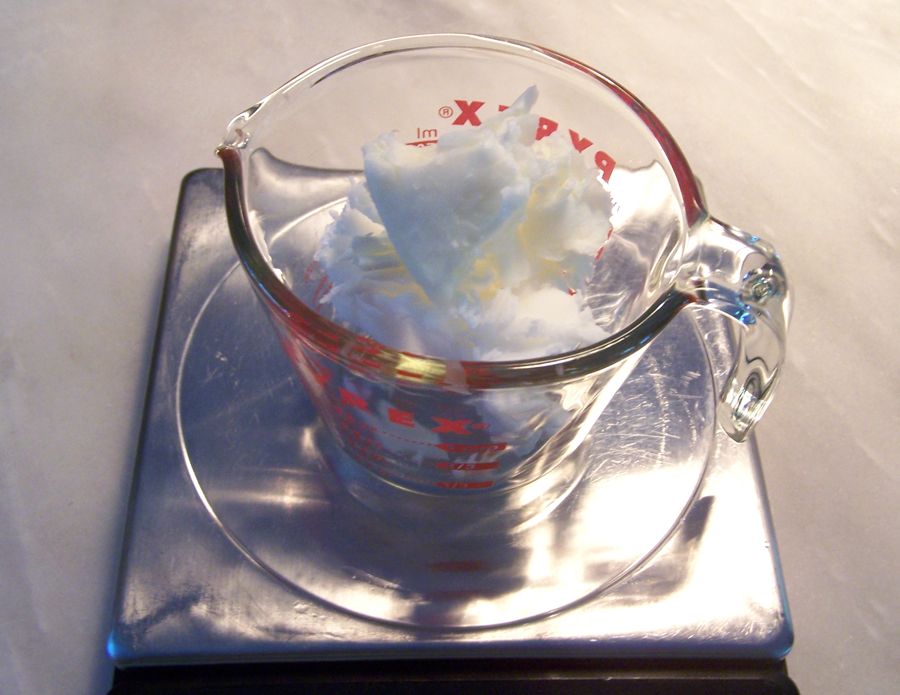
Measure 2 ounces of organic bees wax into a glass measuring cup. We like to use a glass measuring cup to melt all of our ingredients in, it's easy to pour into the tubes and there is no waste.


Place the glass measuring cup with 2 ounces of beeswax into a pan of water on medium low heat and melt completely.


While the bees wax is melting measure 3 ounces of coconut oil and 1 ounce of shea butter into another measuring cup. You should have twice as much oil as you do beeswax, you can experiment with other solid oils just make sure it's 4 ounces total.


Once the beeswax is melted add your coconut oil and shea butter and stir on low heat until completely melted. A wood skewer works great for a stir stick.


Once melted remove from heat and add 2 drops vitamin e oil and your desired amount of peppermint and rosemary essential oils. We like a good amount of peppermint in our lip balms so we added about 30 drops of peppermint and 10 drops of rosemary, be sure to stir well after you drop in your essential oils. We like to test it before it's poured into the tubes, dip your wood skewer into the mixture let dry for a few moments then test it on your lips. More beeswax will give you a more solid lip balm and more coconut or shea butter will make it creamer. More peppermint essential oil will make it more pepperminty of course.


Now your ready to fill your lip balm tubes. If it cools too quickly before you are done filling your tubes just put it back into the hot water and melt or you can pop it in the microwave for a few seconds.


Be sure to let your lip balms cool before you cap them. If you run out of tubes you can always pour the rest of your lip balm into a small container. Or leave it in the glass measuring cup, reheat and pour it again later into tubes.

  • 2 ounces of organic bees wax
  • 3 ounces of coconut oil
  • 1 ounce pure shea butter
  • 2 drops vitamin e oil
  • 30 - 40 drops peppermint essential oil
  • 10 - 15 drops rosemary essential oil
There you have it, a wonderful daily lip care and a great stocking stuffer too. If you decide not to make your own but want to try it we will be at Ruffles and Rust Square this Wednesday, November 28, 2012 from 6 - 9 sampling our lip balms, Peppermint Tea Tree Foot Care, Shea Body Butter's, Beeswax Salve and Hand Poured Soap. Would love to see you there! 

John and Brenda


Tuesday, June 5, 2012

Busy Bees at Circle Creek

We love Spring Time here at Circle Creek and have 20,000 new arrivals this year, honey bee's that is. On May 2, 2012 John and Jay Bottorff released the little ladies (Italian Breed)
into their new homes, two new hives set along the banks of the Pilchuck Creek. 


Once released, they immediately start working, building comb, gathering pollen and establishing their new home. They are very friendly and easy to be around. Staying calm and relaxed when working around them is best, they can sense it if your afraid.


The Queen starts laying eggs and gets acquainted with her new family. The worker bee's head out and gather pollen. First day out at the Creek on one of the apple trees. We have so many apples on the trees this year, it's incredible.


One of our happy hives. We're so excited for the harvest in late Summer, we anticipate lots of honey and bee's wax. Bee's wax is excellent in lip balm and skin care. Can't wait to try out some recipe's. 


More to come on our Bee Adventure!


Tuesday, May 29, 2012

Retro Couch Restoration

When we first came across this Circa 1940's couch we thought..... 

     it has so much personality it deserves a second chance. It's clean lines and beautifully carved wood frame had to be brought back to life.


But before it goes in for restoration we decided to have a little fun with a photo shoot. Such a beautiful piece for a Vintage Photo....


Now off to select the fabric, maybe a charcoal grey velvet with cream piping? Or a forest green?? Stay tuned for updates on the restoration.

Circle Creek Home

Sunday, February 19, 2012

Coastal Living Magazine Love's Circle Creek Homes Vintage-Style Step Stools

We are so excited to be in the March 2012 Issue of Coastal Living Magazine!


We have been using a vintage step stool for years to reach those high shelves in our kitchen and thought it would be a great idea to pass this along. Each step stool is handcrafted by us in our workshop and fashioned after one of our vintage finds. Small enough to be tucked up against the end of your island or cupboard but just right when you want to reach that box of oats on the top shelf. A great addition in the bathroom for children to reach the sink to wash their hands and or brush their teeth. 

Each step stool is unique depending on age and texture of wood. We hand make and paint each step stool to order. Each one is weathered and rubbed with Linseed Oil after completion to give them a smooth aged look. 


We have 4 Styles and 12 Colors to choose from. Find our Vintage Style Steps Stools in our Etsy Shop CircleCreekHome.etsy.com


Thank you Wendy Nutting for the feature on your wonderful blog From Lemons to Limoncello we love it!
      John and Brenda